


How to Connect Salesforce to Power BI
Salesforce is one of the most popular customer relationship management (CRM) platforms used by organizations worldwide. With Power BI, you can easily connect to Salesforce to create insightful reports and dashboards that help you make data-driven decisions. In this blog, we will cover three methods for connecting Salesforce to Power BI: through the Power BI Desktop, creating an ODBC connection, and through the Power BI Service.
Method 1: Connect Salesforce to Power BI Desktop
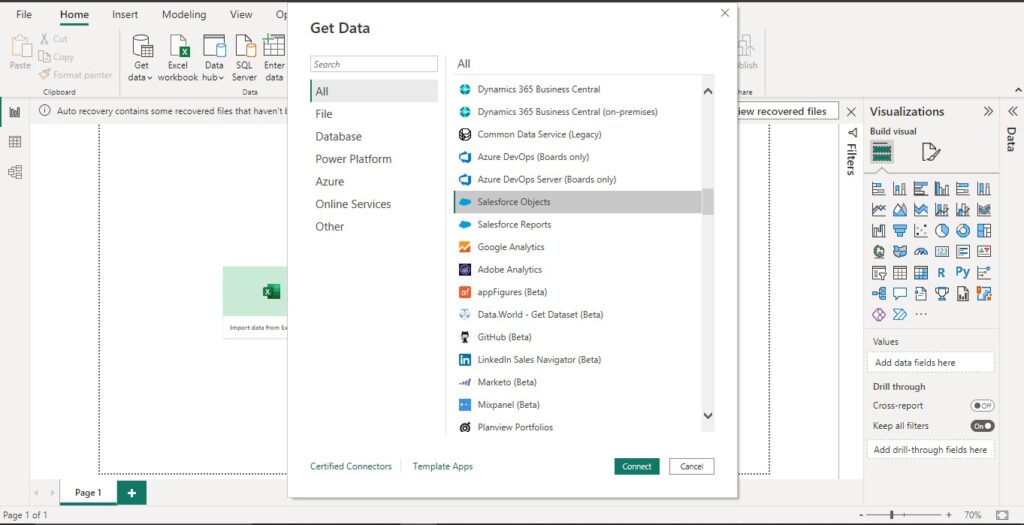
Step 1: Click on “Get Data” in Power BI Desktop and Go to Online Services
Once you open Power BI Desktop, click on “Get Data” to begin the process of connecting to Salesforce. From there, you can select Salesforce Reports or Objects from the list.
Step 2: Select Salesforce Object and Click on Connect
Next, select the Salesforce object you want to use and click on Connect.
Step 3: Connect to Salesforce
You will then be prompted to choose between a production or custom Salesforce instance. Choose production and enter your Salesforce credentials. Once you have logged in, you can select the objects you want to load into Power BI.
Step 4: Load Data and Create Reports
Once you have connected to Salesforce, you can load data into Power BI and create reports and dashboards. Simply drag and drop the fields you want to analyze and visualize, and Power BI will automatically generate a report for you.
Method 2: Connect Salesforce to Power BI through ODBC
Another way to connect Salesforce to Power BI is through an ODBC connection. Here’s how to do it:
Step 1: Install and Configure ODBC Driver
First, you need to install and configure the ODBC driver for Salesforce. You can download and install the driver from the Salesforce website. Once installed, configure the ODBC driver by providing your Salesforce username, password, and security token.
Step 2: Connect to Salesforce in Power BI Desktop
Next, open Power BI Desktop and click on “Get Data.” Select “ODBC” from the list of data sources, and then select the ODBC connection you just configured.
Step 3: Load Data and Create Reports
Once you have connected to Salesforce through ODBC, you can load data into Power BI and create reports and dashboards as usual.
Method 3: Connect Salesforce to Power BI Service
You can also connect Salesforce to Power BI Service to create reports and dashboards that are accessible from anywhere. Here’s how to do it:
Step 1: Connect to Salesforce in Power BI Service
Open Power BI Service and click on “Get Data.” Select “Salesforce” from the list of data sources and enter your Salesforce credentials.
Step 2: Load Data and Create Reports
Once you have connected to Salesforce, you can load data into Power BI Service and create reports and dashboards. Power BI Service offers additional features like automatic data refresh and the ability to collaborate on reports with others in your organization.
Differences between Connecting Salesforce through Power BI Desktop and Power BI Service
Connecting to Salesforce through Power BI Desktop and Power BI Service are both effective ways to create reports and dashboards. However, there are some differences to keep in mind.
One key difference is that Power BI Service offers additional features like automatic data refresh and the ability to collaborate with others in your organization. If you need to share reports with others or collaborate on them, Power BI Service is the better option.
On the other hand, connecting to Salesforce through Power BI Desktop gives you more control over the data and how it is loaded into Power BI. If you need to perform complex data transformations or want to customize.